Tuesday, November 23, 2010

Making Swirly Leaf Cookies for Thanksgiving

I know it’s a little late in the season for autumn leaf cookies. The snow has been flying here in Minnesota and the fall leaves are long gone. However, I recently treated myself to some new cookie cutters and Thanksgiving is my last chance to use them before it’s all Santa and snowflakes. I recently saw this swirly-looking cookie frosting and thought I’d try it myself. It turned out to be pretty easy to do, and so I thought I would share it with you.

The Cookies. I used The Best Rolled Sugar Cookies from Allrecipes, which is an excellent recipe. I rolled the dough about 1/4” thick and cut out various leaf shapes and pumpkins. I ordered my cookie cutters from The Cookie Cutter Shop. They have a very nice selection. Most of my cookie cutters are in the 3” to 4” range.

The Icing. I used Sugar Cookie Icing from Allrecipes. I had used this icing before on my Ladybug Cookies with great success, so I knew it would work beautifully for this project. It is easy to work with and with the corn syrup in it, it develops a lovely smooth surface. I mixed up the icing and divided it up to make different colors. Here was my snag. The food colorings that I have made super-bright colors, not the more muted dark colors of autumn. I’m sure there are better food colorings out there than what I have (I swear I’ve had this same box of food colors for at least 10 years), but I didn’t want to go out and find them. I brained-stormed and decided to try adding a little cocoa powder to each color. It worked! The cocoa powder muddled the colors, making them just right for autumn.

Ack! Day-glow colors!


Ahhh….a little cocoa powder results in subdued autumn colors……


The Technique. First, frost your cookie with a base color. Then immediately dab dots of another color on with a toothpick.


Once you have your two colors applied, start swirling.


Just drag a toothpick lightly across the dots to make any pattern your desire.


You can make veins of leaves.


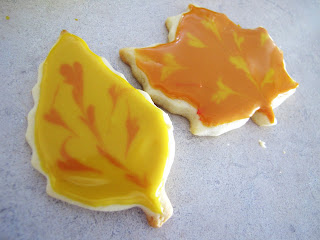
You can even make hearts by simply dragging the toothpick through the dot once.


Beautiful!


This not only works with fall leaves, but you can also used it to decorate Holiday cookies, Valentine’s Day cookies, Easter cookies, you name it!

The only problem is, they are almost to pretty to eat…..

Have fun and Happy Thanksgiving!

Friday, November 12, 2010

I wasn’t born a perfectionist. No, I learned it somewhere along the way. I’m pretty sure I know when it started. My family was turned upside down when I was about 10 years old. My mom had corrective surgery on her back and came out paralyzed from the chest down. It sent our lives into complete chaos. My mom was learning how to live without the use of her legs. We were learning how to live without the mom we had always known. The one who was there when we came home from school, now at a rehab center learning how to use a wheelchair. The one that cleaned the house and made our dinners, now not able to reach the sink or stove. Now we came home to an empty house, relied on neighbors for dinners, friends to clean the house. I was the oldest, so I had to learn how look out for my sister, cook, and clean. My dad still had to work while all this was happening, so the house became cluttered and cleaning it was an uphill battle, but I still tried. Thinking if I could just get some order to this house, I could get some order in our lives.

Finally things settled down and we got used to our new life. We built a handicapped accessible house. That sense of wanting to get some order in my life stayed with me however, and it grew. One summer after my freshman year of high school I decided my life would be a lot better if I lost weight. I was overweight and did need to lose weight and I was successful. I lost 50 pounds in about 7 months. That’s when I started to really control my eating. I would eat the same thing day in and day out, oatmeal for breakfast, apple and yogurt for lunch, plain chicken breast and veggies for dinner. It was very boring and I never let myself indulge. If I did indulge, I would exercise like crazy to burn it off. As I’m typing this, it’s sounding a lot like an eating disorder, isn’t it? But it wasn’t, I never got dangerously thin. I was always a healthy weight, but the power I got from controlling my weight and eating was intoxicating.

Soon the perfectionism travelled to my studies and I started to get straight A’s. If I could control my weight I could surely control my grades too. I was becoming a perfect person. Perfect body, perfect grades. But why? I didn’t know then, but I know now that it was so I had control over my life. It certainly had nothing to do with happiness, because I was not happy. This lasted through high school and college. Then it started to unravel. Thankfully.

There are several points in my life that have been keys to my learning how not to be perfect. The first was meeting my husband. He taught me how to loosen up a little. I started focusing less on school and working out and more on actually enjoying life. Our time was spent trying to avoid roommates and homework so we could go make out and dream about our future together. My future didn’t involve being skinny and perfect, it just involved being with him. My grades started to drop and guess what? I survived. I got my first C in a class and I still graduated with distinction.

I started easing up on perfectionism even more when I was diagnosed with cancer. When that happens, you really just have to let go and put yourself in the doctors’ hands. It actually felt nice to not be the one to worry for once. One of my doctors even told me to let them do all the worrying. You can’t believe how good that felt to hear. Having five surgeries in 6 years meant that I wasn’t able to keep up with my exercising and I did gain some weight back and guess what? I survived. I’m not skinny anymore, but it’s ok. Now I feel healthy, like I’m being nice to my body, not abusing it, trying to fit it into some stereotype. Now I’m just me. I REALLY enjoy food now, but have kept the sensibilities of moderation and nutrition that I learned in my perfectionist days. I exercise now for health and energy, not just to maintain my weight.

Changing careers has also had a big impact on me. Going from a job where I twiddled my thumbs in front of a computer, to one where I’m dashing about with too much to do in not enough time has taught me that sometimes it’s just “good enough.” It’s not perfect, but it’ll do.

I still struggle everyday with my perfectionist tendencies. I do like order and tidiness since I found that it helps me be more efficient, but there is a limit now. Sometimes the house only gets cleaned once a month and we have piles of bills and papers on the kitchen counter and I live with it. Sometimes I don’t get everything done at work or I make mistakes and I live with it. And guess what? I’m happy. I’m happy to say, “I’m not perfect!”

The internet is an interesting place. You can show only your good side. You can show your mean side. You can even make up a completely different personality. You can be one person on one site and another person on another site. You can choose what you put out there. My life hasn’t been all peaches and cream. I can be bitter and angry, sometimes snarky. It’s a part of who I am and sometimes I show it. It’s tempting to only show my good side and be all nice, but I’m not all nice. Sometimes I say stupid things and the introverted perfectionist in me has a really hard time letting it go, but I'm learning.

It’s really tempting for me to only post my “perfect” photos and leave out the ones I’m less than thrilled with. I decided that I would put them out there anyways, just as a way to say that I’m not perfect and I’m not pretending to be. For instance, I wanted to delete this photo of Slow Cooker Chicken Stroganoff, but I decided not to. It shows who I was at the time I took it - someone who hadn’t wielded a camera in a creative way in years. Look how far I’ve come.
Original photo of chicken stroganoff


A much better photo of Chicken Stroganoff

Sometimes the food, the lighting, the angle, I don’t know – even the air, come together serendipitously and create the most beautiful picture. One that I’m really proud of. Other times I just can’t get it right. I have a picture in my mind how it’s going to be, but it just doesn’t translate through the camera. Sometimes I’m tired and grumpy and I say, “Here, I made the friggin’ dish, now here’s a friggin’ picture.” Sometimes I’m just not inspired and I have no idea how to take a picture of a dish. Sometimes the food is just plain ugly. Either way, I put it out there. It’s just me. I’m a cook, I’m a photographer, but I'm not perfect.


Ick, I should have taken this one in natural light, but guess what? There is no natural light at night!


Serendipity

Friday, September 17, 2010

Cameras, Creativity and Coming to an End


I feel like I’ve been deceiving you all the past few months because I keep forgetting to mention that I got a new camera! My previous blogs about photography talked about my old camera, the Canon PowerShot SD850 IS, which is still great to use because it’s so small and easy to slip into my purse and take with me. However, I got a “new” camera in May. I say “new” in quotes because it’s actually a hand-me-down. I’m lucky to benefit from my dad’s love for photography. He bought a new digital SLR camera and “sold” me his old camera. I say "sold” in quotes because he gave me an amazing deal, as only a father can do. So without further ado, here it is!

It’s a Canon SX10 IS. While I would still love to have a SLR, this one will do for now, at least until I win the lottery. It has terrific resolution and zoom. It’s faster so I don’t have to hold the camera so still and steady, which is a real bonus especially after having a gin and tonic. Another thing I like is that the screen on the back flips out and turns around, so I can take self portraits, like this one.

My dad and I were talking a while back about how far photography has come in the past 20 years. I’ll say! 20 years ago I was in a photography class in high school learning how to use a dark room. I really liked being in the dark room. It was really quiet and, well, dark. A great environment for an introvert like me. I even liked the smell of the developing liquids. You had to be really careful not to waste film or paper because it was expensive. Now if you take a bad picture, you know right away and can retake it and delete it. No harm done! We are so lucky to live in this age of digital photography.

The other photography topic I wanted to talk about is creativity. I’m a really creative person, which I love sometimes. Other times I don’t. I have this feeling like I need to create gifts for everyone, I need to make things from scratch all the time. Why buy jewelry as gifts, when I can make my own? Why buy a quilt for the bedroom, when I can make my own? It’s exhausting! And I can’t help myself. I just have this desire to create, create, create! Using this website is a great example. Sometimes I get really tired of taking photos of everything I cook and bake, but I honestly can’t stop. I get all of these great ideas on how to take a unique photo and then I HAVE to do it! I guess it’s how I express myself. I’m a very quiet person and I don’t talk much. Creating things is how it all gets out. Because of my health problems, I don’t have as much physical energy as a typical person, so my energy comes out in being creative.

Being creative just doesn’t come from nothing, though. I find inspiration everywhere. I admit, I’ve taken so many photos of food, it’s hard not to repeat myself. However, I still try to inject something new every once in while. I mostly get inspiration from magazines, nature, and the internet. One of my favorite magazines is Real Simple. It has an aesthetic that I totally love. Clean and simple. I’ve posted a couple of photos to show how I get my inspiration.

This photo by Stephen Lewis from the July 2010 Real Simple magazine cover,…..

……inspired this photo of lemon blueberry scones.

(There was another photo that I saved from an earlier month, but have since recycled, that depicted slices of citrus with facial products, which was further inspiration for this photo.)

It’s a lot of fun, but I am contemplating taking a break from photography for a while. At least food photography. At least from this site. At least cutting back a little. Oh, who am I kidding, I can’t stop! Seriously though, if you start seeing less and less photos from me, it means I am taking a break and taking care of myself. My time on this site is coming to an end. This site has taken over most my free time and I need to work on maintaining a better balance. I was taking a photo of chicken for the umpteenth time the other day and realized what a chore it felt like, so I’m redirecting my creative focus for now. I do have that quilt I want to make for our bedroom and some ideas for some more jewelry. Plus that pile of Cooks Illustrated recipes and other recipes clipped from the newspaper and magazines needs some attention. I still love taking photos of cookies and cupcakes and the like (I won’t be able to resist posting photos of those), but no more chicken! Anyways, I hope this blog was helpful and has inspired YOU to be more creative.

I’ll leave you with some of the photos I took on our latest trip to the lake up north, some of which I’ve entered into a contest where the winners’ photos will be displayed at the local hospital.


Purple Wild Flower


Pileated Woodpeckers

Layers of Leaves


A Fungus Among Us Trees

Heron

Tuesday, August 17, 2010

Project: Key Lime

It all started in the produce section of the grocery store. A 1 lb. bag of key limes for $2.99 caught my eye. I’ve always wanted to make a key lime pie from scratch and it just so happened we were going to visit my parents that coming weekend. My parents are huge key lime pie fans. If there is key lime pie on the menu at a restaurant, they are ordering it! This was the perfect time to experiment.


Not being familiar at all with key limes and seeing how tiny they were, I had no idea how many I would need to make a pie. So I bought 2 bags. Yeah. I wasn’t counting on those guys being so juicy. One little cherry tomato-sized key lime yielded ½ tablespoon juice. Way more than I expected! Plus, they are packed with so much flavor and a tartness that can’t be beat. I love key limes! I decided to make Key Lime Pie VI from allrecipes.com and it turns out I only needed about ¼ lb. to make that recipe. So, I had 1 ¾ lb. key limes left. What to do with them???

Key Lime Pie VI

First, I decided to make another top-rated key lime recipe from this site: Key Lime Cake II. That was fantastically lemony-limey deliciousness! I then decided to get a little creative and make up some of my own recipes. First up was booze, of course. I made a Key Lime Martini, which I’ve posted in my recipe box. Then the creative juices started to flow. I had a jar of coconut oil in the pantry that I bought and hadn’t used yet. There was my flavor combination: Key Lime Coconut. Now, how should I combine those two flavors? Being inspired by the new show on TLC “DC Cupcakes,” I decided on cupcakes! So there was my recipe: Key Lime Coconut Cupcakes.


Key Lime Cake II

Coconut oil is a popular item at the store I work at. It’s been getting a lot of flak recently because it is mostly saturated fat. However, it turns out coconut oil is very good for the heart because it contains lauric acid, which prevents high cholesterol and high blood pressure. Studies have shown that people living in tropical regions whose main cooking oil is coconut oil are healthier. Coconut oil is also very good for the skin, hair and digestion. Plus it tastes great! One of my coworkers loves to use it to pop popcorn in. I encourage you to do some research for yourself to see if coconut oil is a good choice for you. There are different varieties of coconut oil. Virgin, unrefined coconut oil has a coconut aroma and flavor, whereas refined coconut oil does not. I used virgin coconut oil in my cupcake recipe because I wanted the coconut flavor.

I did some research and found out that coconut oil can replace butter and shortening equally in baking. So I decided to try it and it worked! It gave the cupcakes just a hint of coconut flavor, but still let the key lime flavor shine through. I didn’t have a perfect product right off the bat, and it turns out I’m not that great at baking cakes from scratch. However, my cakes from box mixes are among the best! My first batch of cupcakes turned out dry and crumbly. I was worried that either the coconut oil wasn’t working or I didn’t have the right proportion of ingredients. It turns out that I’m just too fast and efficient in the kitchen and I just needed to slow down a bit. I found these helpful hints for a moist and tender cake: sift the flour, beat the fat and sugar well (this is the part I was skimping on), beat well again after adding the eggs, and don’t over mix after adding the dry ingredients. I followed these tips and low and behold – a moist tender cupcake that didn’t fall apart. Hooray! (‘Cause if that didn’t work, I might have given up on the whole project……I was getting frustrated at that point!)

Next came the frosting. I wanted to use a cream cheese frosting because it’s my favorite and I knew it would go well with the citrus and coconut. However, I didn’t know what would go best with the cupcake. Should I use coconut oil or butter? Key lime or vanilla? Or maybe some combination of the above? I made up four different frostings to taste test. I think I knew which one was the winner even before I frosted the cupcakes, since I couldn’t stop pinching tastes of it: the frosting made with coconut oil (instead of butter) with key lime juice. The only problem was the juice made the frosting too runny. The solution: replace part of the juice with zest. Bingo! I had my frosting.

The different frosting combinations I tried.

Taking a cue from my favorite celebrity chef Ina Garten’s (the Barefoot Contessa) coconut cupcakes, I topped the frosted cupcakes with sweetened flaked coconut. Only I like coconut toasted, and these cupcakes are all about what I like, so I toasted the coconut.

Taste-testing the cupcakes - someone had to do it!

I was so excited to follow my finalized recipe and have the cupcakes turn out so beautiful. Developing recipes is tough, but lots of fun, even more so when you have success! I hope you try out my recipe and let me know what you think. I think they are pretty darn good and can’t wait to make them for my friends and family.


The final recipe! Key Lime Coconut Cupcakes

Saturday, February 20, 2010

Food Photography - Part 2

Thanks for joining me again, as I continue my discussion on how to take great food photos. In the previous blog, I discussed lighting, one of the most important aspects of good photography. Now we will move on to other techniques.

2. Camera and Software. My camera is a Canon PowerShot SD850 IS Digital ELPH 8 MP Digital Camera.
It's a good little camera, but nothing fancy. I use the manual digital macro setting to take my close-up pictures of food. I never use the flash to take my food photos. My computer has a neat little program that lets me adjust the contrast on the photos when I import them on to the computer. A lot of times, my photos are so flooded with light, it tends to wash out the colors. So I bump up the contrast just a little to help the colors stand out more. But you want to be careful to not bump up the contrast too much or it starts to look artificial.

3. Aperture. The best way to describe aperture is with a photo:
Aperture refers to the depth of field. See how the almond in the middle is in focus and the almonds in front and in back are out of focus? This refers to aperture. It's one of my favorite things to experiment with because it gives the photo depth, more than one dimension. Some cameras will let you adjust the "f-stop." Mine doesn't (Santa, are you taking notes?), so I just have to play around with food and camera placement to achieve the desired depth of field.

You can use objects, such as a lemon slice or a tea cup, to place in front or back of the food to give the photo more depth. I love to take the same food item, more cookies or another bowl of salad, and place it behind, making it out of focus and thus giving the photo more depth. Like this photo:


4. Angle. This is something you just have to experiment with. Take lots of photos from many different angles. More often than not, I find myself taking the photo at the same level as the food. My camera is right down there at the same level as the plate. I also like to get up close to show as much detail as I can.
5. Styling. A lot of the time, I just have my kitchen counter as the back-drop. Recently, I've been using different colored fabrics from a quilt project that I've never started. Sometimes I'll use different colored napkins or placemats. Adding a utensil, like a spoon, adds some interest. The color of the "prop" usually depends on the colors in the food. Sometimes the food I'm photographing is very light, so I'll use a dark background to make it stand out, like in this photo of a glass of milk and coconut cookies.

You can also pick out an accent color in the food, and use that as your backgroud or prop color, to help the food stand out more. In this photo, the wild rice soup is rather monochromatic, except for the carrots, so I chose an orange napkin to help the carrots "pop."

I also love to use "natural" props, such as parsley and citrus slices. They can add a nice burst of color to your photos.

It's hard to put in words what it is that I do, so I hope I've made it clear to you. If you have any questions, just ask! Photography is an art form and I find it really fun and a great way to express myself. Most artists' goal is to evoke feeling in the viewer. My goal is to evoke hunger! I hope this blog has made you hungry for photography. Now go out there and take some great pictures!

Friday, February 19, 2010

Food Photography - Part 1

A little over a year ago, I started taking food photos and posting them to allrecipes.com. Now, I'm no expert at photography, but I have taken classes and been encouraged by my dad, who also loves photography. At one time in high school, I thought I might like to be a photographer. I also thought I might like to be a chef, an interior designer, or a nutritionist, but somehow I ended up an engineer (scratch head....). Anyways, I hadn't done much photography in quite a while (since high school, basically). Enter in allrecipes.com. I've been using the sight for years, but never did much reviewing or taking pictures, mostly just printing off recipes. Since quitting being an engineer, I've had a lot more time on my hands, so I started my new hobby.

The first photos I took of recipes weren't that (ahem) great. Like this one......


(Yeah, I read the comics while I eat dinner, who doesn't?) I was just excited to get a photo uploaded, never mind the quality! I knew I could do better though, so I started experimenting and in no time I was taking better photos. Here are some tips that I've put together that I hope you find useful.

1. Lighting, lighting, lighting. It's the most important aspect of photography, and also the biggest pain in the butt sometimes! I've found that natural light works the best for me. I have a kitchen counter that gets great natural light from all around in the daytime (at night it's another story, but I will talk about that later). Find a room that gets great natural light, but resist the urge to put it right next to the window. It's best not to put the food right in the sun beams, but in a spot where the light is more diffused. My counter works great because I get light coming in from the living room in one direction, and even more light pouring in from the patio door in the other direction, yet the counter is far enough from either to get diffused light. This lets me play with backlighting or have the light bounce off the side of the food, like these photos.....

This photo of a brownie has good lighting from all around, but a majority of the lighting is coming from the back.
This photo of french toast has a lot of light from the side, making the strawberry shine. The brownie and french toast photos were taken from the same counter, just different directions.

Unfortunately, natural lighting isn't always possible, especially if it's Minnesota in the dead of winter, and it gets dark at 5pm, long before dinner is served. Sigh.....I was having the hardest time getting good photos. I tried different lamps, overhead lights, anything. If you look through my past photos, you can see me kind of experimenting with different lighting techniques. I was never satisfied because I always had shadows and I couldn't get the light to "bounce around," like I do with natural light. My hubby understood my angst and got me a wonderful birthday present. This.....A light box! It's a tent with two lamps. It diffuses the light so I don't get shadows. He bought it from http://www.cowboystudio.com/ It is one of the tabletop kits. It still isn't as nice and natural looking as sunlight, but at least I don't get shadows! Here's one of first photos I took with my new box. True color and not a shadow anywhere!


If you would like to take photos using artificial light, I would suggest using fluorescent daylight bulbs, which is what my setup uses.

Well, the topic of lighting is a long one, so I think I will continue my discussion in the bext blog. See you there!